

Create new content in Blackboard, with accessibility in mind.
The following resources will guide you through how to implement accessibility best practices in your course during the creation process. Applying accessibility practices during the creation process will save you time and effort down the road.
By following these guidelines, you'll ensure your Blackboard course content is accessible, navigable, and welcoming to all learners. Still need help? Don’t hesitate to reach out to your our accessibility support staff!
Add Accessible Files
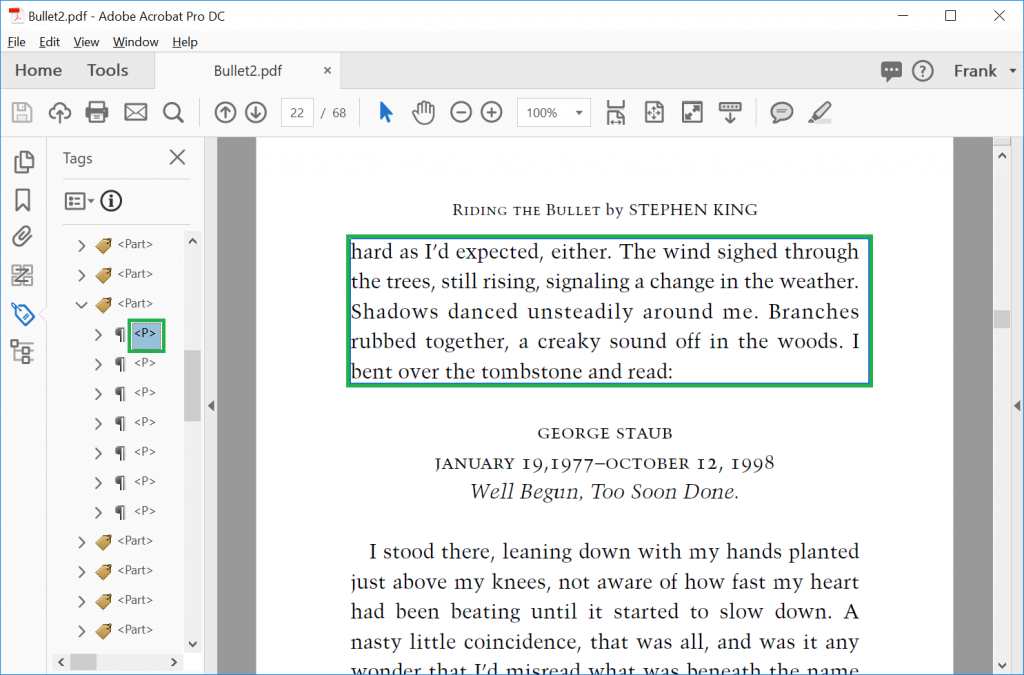
Instructors should add files that are accessible – readings, resources, assignments, etc. The most common are PDF files. When people talk about "accessible" PDF files, they are usually referring to PDF files that have searchable, select-able text and tags. Tags are the basis of an accessible PDF file. They indicate the structure of the document, communicate the order in which items should be read, and determine exactly which items will be read.
Avoid scanned PDF files. These files are PDF images and are not readable by assistive technology.
Examples
Bad PDF example

Good PDF example
Using Accessible Colors
Color Contrast
Color contrast refers to the difference between the color of your text and the color of your background. If there is not sufficient contrast, the content will be difficult to see for everyone. For those with low vision, it may even be unreadable.
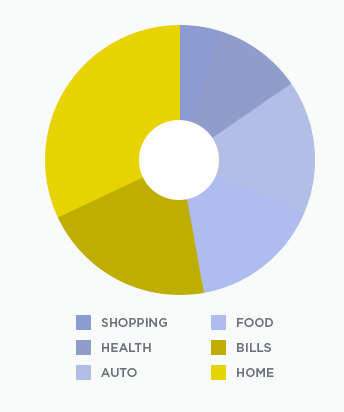
Insufficient Color Contrast

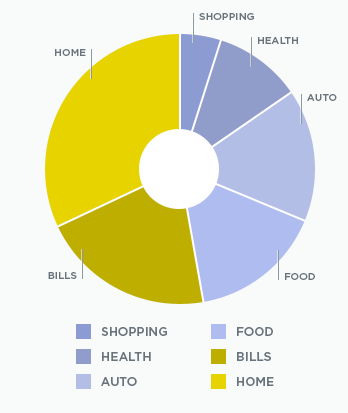
Sufficient Color Contrast

Using Color to Convey Information
It’s important that you don’t use only color to convey information. For example, listing the required elements of an assignment in red could impact someone who is colorblind, as they may not be able to decipher what is required versus optional in the assignment.
Examples
If you are using color to convey information, include another indicator such as a symbol or description.
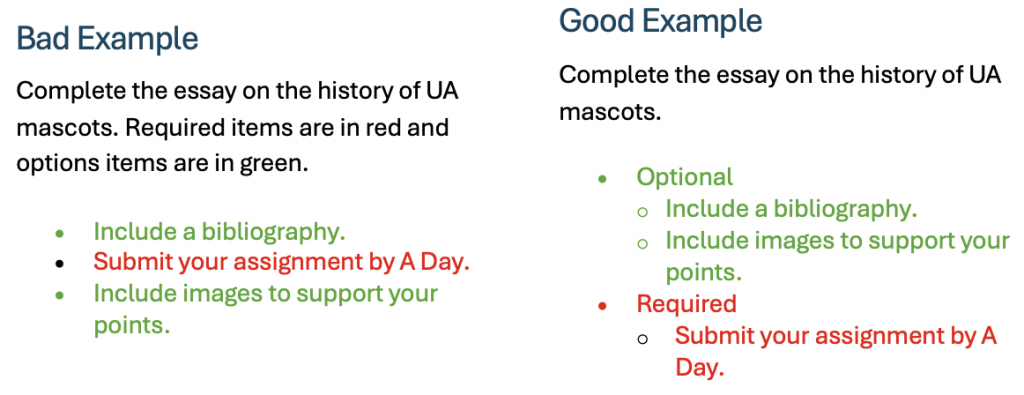
When using charts, be sure to distinguish sections with dividers and text indicators.
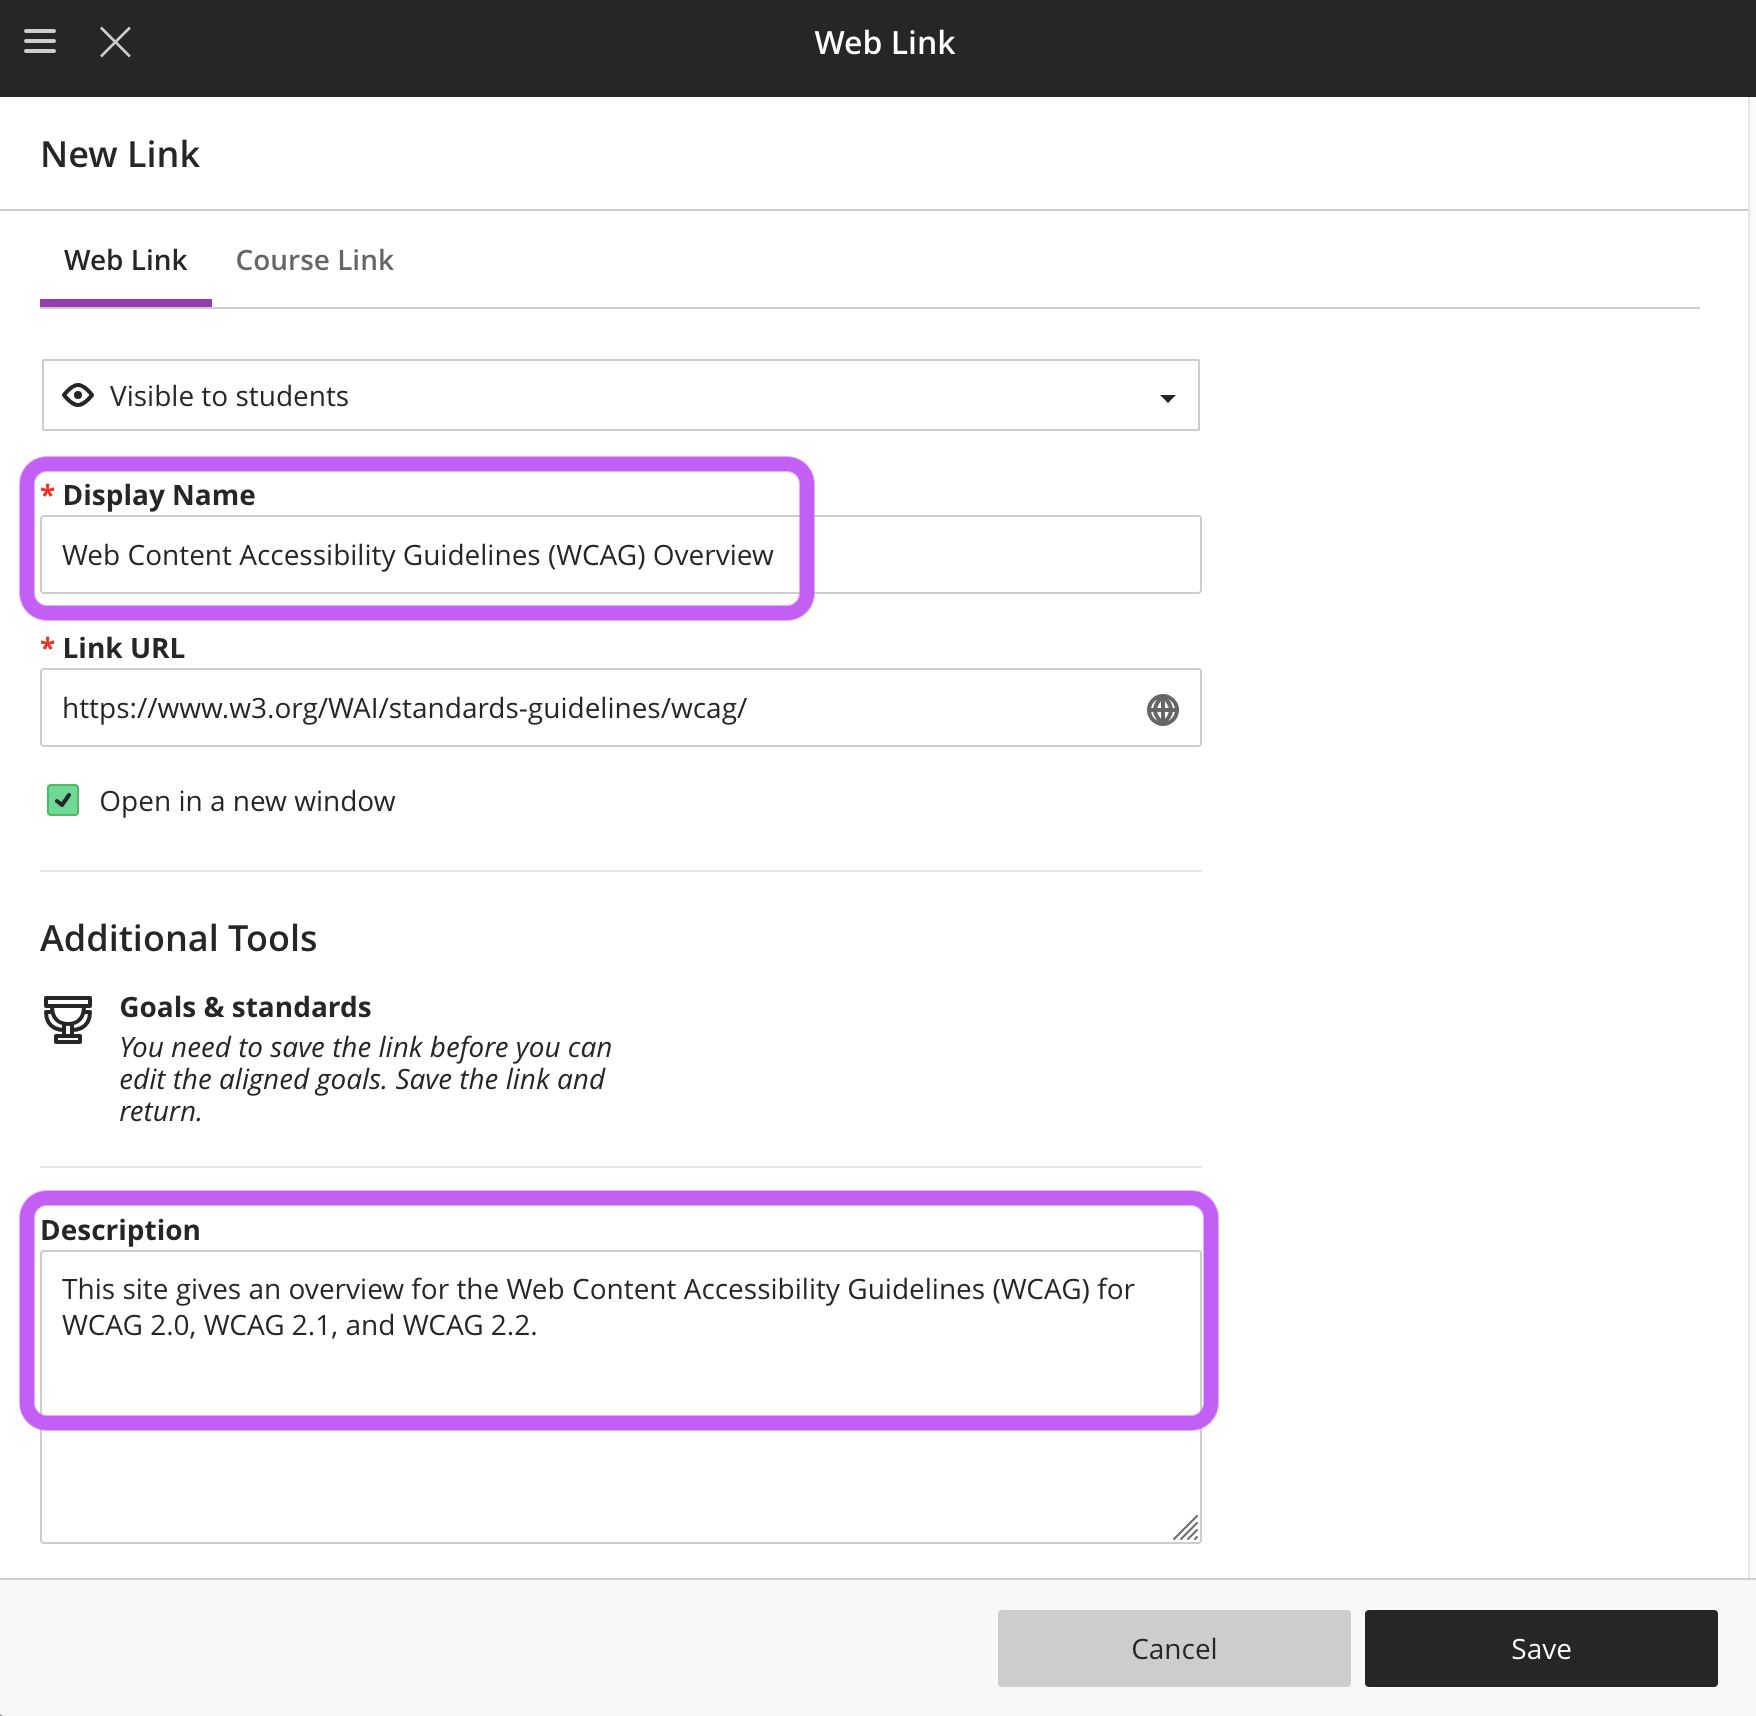
Using Descriptive Links
When you add a hyperlink to your course content or navigation, ask yourself: if I read the link text out of context, would you understand what the link is for and what selecting the link will do?
- Describe the destination of the link
- Avoid generic phrases like “click here” and “more”.
Screen reader users often navigate from link to link, skipping the text in between, or use a keyboard shortcut to view a list of all links present on the page.
Examples
When adding a link to your Blackboard course, provide a descriptive Display Name so students know what they are going to find at the link. Optionally, you can add a description for more information.
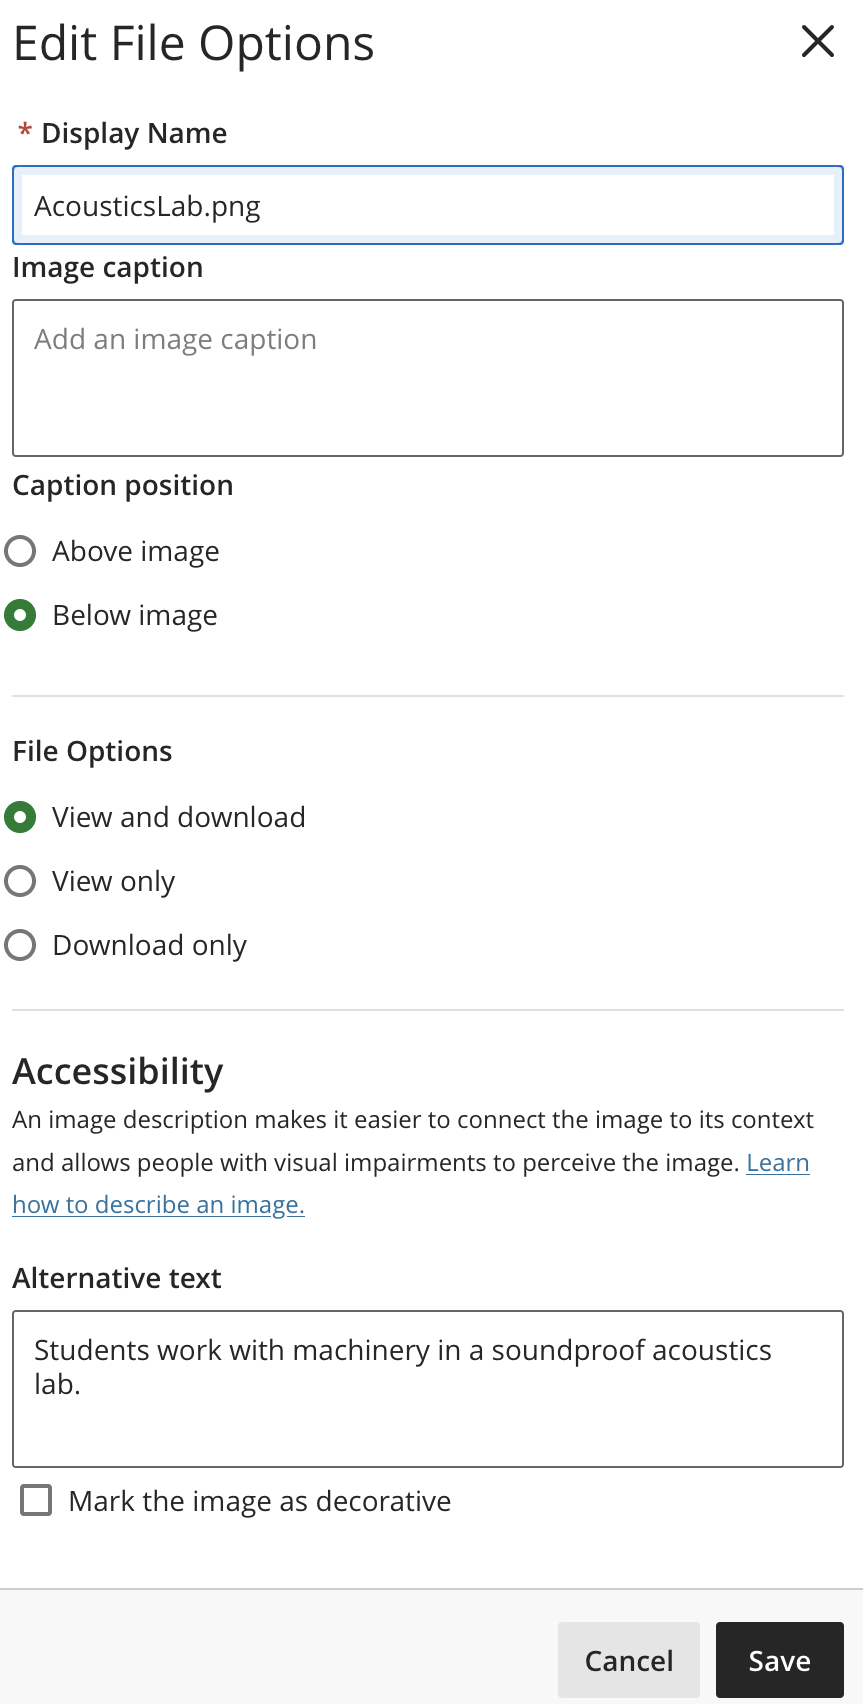
Add Alt-Text to Images
Adding alternative text (alt text) to your images is important to making them accessible for everyone. Alt text provides a description of an image for someone who is blind or has low vision, which is read to them by a screen reader. It is also the text that pops up if an image on a website does not load correctly.
- When uploading an image in Blackboard, a field for “Alternative text” appears, fill this in.
- If using Ally, click the red/orange gauge and it will prompt you to add/edit alt text.
- Mark decorative images as such (if they don’t convey meaningful info).
Example
When adding an image in the Blackboard Ultra content editor, you will be prompted to give naming and accessibility details for an image.
Using Proper Headings
Headings are used to structure and organize content on a page by dividing it into sections, making it easier for readers to navigate and understand the information. Headings come in different levels, but the Blackboard content editor has Title, Header, Subheading, and Paragraph.
Use Built-In Headings
- In the Blackboard text editor choose Title, Header, Subheader, or Paragraph from the text formatting drop down.
- Don’t simulate headings by bolding or increasing font size.
Example

Create Accessible Lists
Use Built-In Lists
Lists are a helpful and intuitive way to order content. They can be ordered or unordered. Ordered lists are appropriate for when your content has an intentional order, where some items must follow others. Unordered lists, on the other hand, are good when your content has no specific order.
Example
Use the Blackboard Content Editor & choose the Lists button (it has the paragraph symbol). Then choose the type of list you would like to create.

Create Accessible Tables
Use Tables for Data Only, and Add Column Headers
Tables should be used to display data. Avoid using tables for page layout, though it might be tempting to do so. Layout tables do not allow users flexibility in viewing the content since it is “trapped” in the table cell and might not be read in the correct order by a screen reader.
- Use a table caption
- Use table headers
- Avoid merging and splitting cells when possible.
Blackboard Content Editor and Tables Example
In the Blackboard content editor, use the Insert Table button to expand the Tables menu. Check the box for Header Row and/or Header Column to make your table more accessible.

Universal Design for Learning
Universal Design for Learning (UDL) is a framework that can improve and optimize teaching and learning. It focuses on the design of products and environments to be usable by all people, to the greatest extent possible, without the need for adaptation or specialized design.
UDL in Blackboard Courses
ENGAGEMENT
Include multiple means of engagement
Offer action-oriented feedback: Guide learning by emphasizing the role of effort and process. (UDL Consideration 8.5).
REPRESENTATION
Include multiple means of representation
Illustrate through multiple media: Make learning come alive with simulations, graphics, activities, and videos.(UDL Consideration 2.5)
ACTION & EXPRESSION
Include multiple means of action & expression
Optimize access to accessible materials and assistive and accessible technologies and tools. (UDL Consideration 4.2).
Blackboard Example
Instructors can provide feedback throughout the course.
Blackboard Example
Instructors can build complex resources with text, images, embedded videos and activities as well as quick knowledge check quizzes.
Blackboard Example
Check the gauges throughout your course or use the accessibility report and fix any flagged issues.